Back when I took up quilting, I was using invisible nylon thread in the top and cotton thread in my bobbin. Invisible thread solved the issue of what colour to use for quilting on the top side, and hid any little side tracks my needle took that weren’t in the plan. The same reasons people use it still.
Now, at the time, polyester invisible thread either wasn’t available or I didn’t know about it. But the nylon version I used was NOT fishing line, but a reputable brand purchased from the quilt store.
After quilting a couple or so quilts with the stuff, I noticed that when I was back piecing with my cotton thread I was getting a lot of breakage. Upon inspection, my needle clamp on my Bernina 1630 had a groove worn right in it. The cotton thread was now passing along this groove and being shredded. I took the machine to my local serviceman, and he buffed the groove out. Right then and there, I decided I wasn’t going to use invisible thread again – a promise I’ve mostly kept.
Now I can hear some of you saying, “When using invisible thread Linda, you’ve got to loosen the top tension. Didn’t you know that girl?!”
Well, actually, yes, I knew that, and followed that religiously. My local quilt shop had taught me all the protocol for using this thread – loosen the top tension considerably, make sure it can unwind and get tamed well before it makes it to the tension disks, etc. But the thread guide on that Bernina directed the thread so it came straight down and close to the needle clamp. No loosey-goosey threads before it went in the needle. A design feature that I think was rather smart.
So a few years passed, and one of the quilts I used the nylon invisible thread on was well-loved and well washed. And I know I put it in the dryer on occasion. Whether it was the dryer that made the invisible thread brittle and break, or if it was the weight of the quilt, my quilting stitches were coming out. This is not a problem I’ve encountered when quilting with cotton thread only.
OK, so at this point there are some of you who will say, “I’ve stitched lots of quilts with invisible thread and had no problem.” or “Ms. Author recommends invisible thread for machine quilting!” All I’m saying to you is this: “Yes, lots of people love invisible thread, and many people swear by one brand or the other to be the best, but this was my experience. Polyester invisible thread should be better as it is not affected by heat. But for myself, I now love natural threads, and I don’t worry about how they’ll hold up in the long run. If you love invisible thread, that’s fine with me.”
Now that’s my disclaimer. I don’t want anyone to think I’m starting a hate campaign, or trying to draw lines in the sand. That’s not really my point. My point is that after Tuesday’s success with my New Beginnings Issue, I decided to fix this old quilt’s problem. An oldie-goldie problem, as it had been sitting in a drawer for years waiting to be tackled.
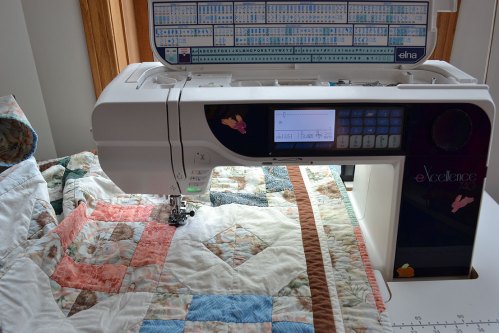
I decided that the quilt was not in good enough shape to warrant spending countless hours unpicking the remaining quilting stitches. So I dug out a spool of variegated 30 weight Sulky Blendables cotton thread that matched both the back and front of the quilt, and set up my Elna Excellence 740 for some stitching time.
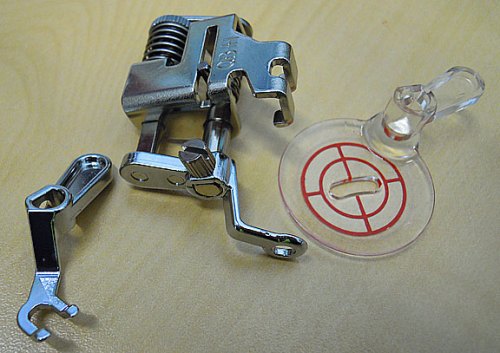
This was a great opportunity for me to try the integrated adjustable feed (acufeed) ditch quilting foot. Pat A. had used hers just a few days ago, and told me she quite enjoyed stitching with it, so this was my opportunity to put mine through the test.
This foot works on Elna 740 and 7300, as well as the Janome 6600. The integrated feed system on these machines is like having a built-in walking foot. And you can put different feet on this walking mechanism. Currently, there are 4 different feet – all-purpose that comes with the machine and three you can purchase separately: 1/4″, open-toe, and the ditch quilting. These three are on the store website, where I’ve taken up-close and personal photos (the feet are almost blushing). http://store.alongcamequilting.com/stores_app/Browse_dept_items.asp?Shopper_id=8965315234378965&Store_id=487&Page_id=17&categ_id=151&parent_ids=0,149
Boy did that Ditch Quilting foot work well! The guide helps you stay in the ditch. As with all the integrated feet, it fed through quietly and easily. There is no clunk-clunk feel that is to be expected with a regular walking foot. I was rather worried that since the quilt had been through a few washes and was slightly wrinkled, that I might end up with puckers on the back. But no!
(The bunny stickers don’t come with the machine – I like to personalize. )
The auto-lock feature was also great to use. I wanted to make sure that this bunch of stitching wouldn’t come out, so I took a couple of stitches forward, then backward, hit the auto-lock button which sewed in place a few times, and then stitched my row. At the end of the row, I took a couple of backward stitches and again used the auto-lock button. I then pushed the thread cutter button, and I was ready for the next row.
(The auto-lock button is the reverse double-arrow. The reverse single arrow is the reverse button. There is also the needle-down button, and thread cutter buttons above them.)
Most of the quilting was done in the ditch, but I also had some free-motion on the border. For this I used the convertible free-motion quilting foot with the open toe. I quite like this foot as well. The height is adjustable, and it is not a hopping foot (where there is an appendage that sits on the needle clamp and goes up and down with the needle motion).
In five hours, I had that quilt completely re-quilted. What a feeling! There is nothing like getting old problems and tasks finished! And now someone can squirrel it away to their bedroom again.
Original Publication March 18, 2011 on https://alongcamequilting.wordpress.com/


