
Everyone has one. The quilt with an Issue. I didn’t know that this particular quilt actually had an Issue though, until I got it back from Jane, my long-armer. Matter of fact, I believe it was after it was bound ready to be hung in the store that someone pointed out the Issue. That was when my stomach sunk.
Now this quilt had to be hung without delay. I designed it for our Block Bonanza program, and it was now finished – just in time – for its unveiling. Selling finishing kits meant that people needed to see the final product. So up it went in the store, and only a select few knew the Issue. And, thankfully, no customers spotted the problem, or else they were wonderfully polite and ignored it. God bless them.
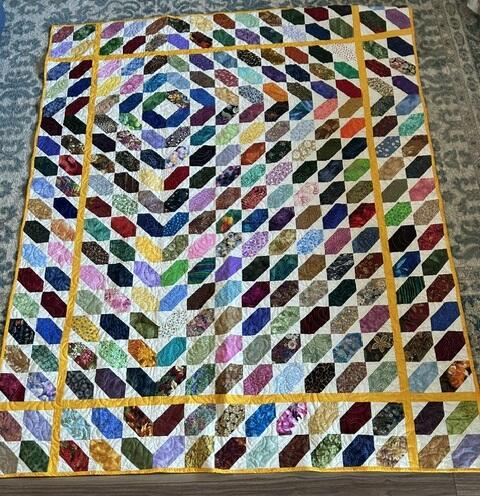
That was a more than a year ago, and the quilt had come down a few months later. But since it is March and the quilt is done in beautiful spring colours, the time had come to gather up my nerve, and fix it so it can once again be hung in the store, and featured on-line with a real photo, instead of the EQ drawing. So today was the day.
The Issue: There are four blocks all identical in the quilt. However I had turned a half-square triangle upside down in one of them. Now, if this wasn’t “the quilt” for my pattern, it wouldn’t have mattered as much. But you can’t go and design a pattern, and then not sew it up accurately. Anyway, I like my stuff done right, and this was a real needle in my thumb.
I started with laying a thin sheet of onion skin paper over the quilting design that was stitched on top of the nuisance half-square triangle. I traced in pencil the design. Then I unpicked the quilting stitches. I then took a moment to reflect that any step past this point might mean ruining the quilt if I did it poorly. Gathering my nerve, I went underneath a stitch of the square with my Clover thread pic. There was no way I could get my seam ripper in there without cutting the fabric. I pushed the pic until the thread broke. Since I sew with a short stitch length, it was generally easier to take out the stitches with the thread pic than with the seam ripper. Here’s a picture of the half-square triangle after most of the stitching has been removed.

I pressed the seams on the half-square triangle flat, and repressed those that needed to be folded under.
I then placed the square back in the quilt – pointing the right way! I used a single strand of matching cotton thread, and with a ladder stitch invisibly sewed the square back in place. I did two rounds, to make sure it was sewn in well. How relieved I was that the square was flat! All that embroidery I did as a kid paid off!

Next I laid the paper with the quilting design back on top of the square. I chose a pink Clover mechanical pencil as the quilting thread had some purples and pinks in it. I poked through the design to the quilt top every 1/8″ or so. Then I removed the paper and connected the dots with the same pencil.


I threaded the machine with the identical King Tut threads used by Jane in the top and bobbin, dropped my feed dogs, and quilted the design.

Once I finished quilting, I buried my threads. Then I used the little brush on my pencil and brushed out any of the pink markings. I lightly misted the spot with water, and then again lightly brushed at the previous quilting marks. Just like that they disappeared, and so did my Issue.

Now with a new Spring in the air, and a rediscovery of hand stitching, this quilt lives up to its namesake, “New Beginnings”.
Original Publication March 15, 2011 on https://alongcamequilting.wordpress.com/